
What is Moodle?
Moodle is TRU’s main online learning platform and an important part of your university experience. Think of it as your online learning space, connecting you with your courses, instructors, and fellow students.
You’ll likely use Moodle in most of your courses, but every instructor uses it a little differently. Getting familiar with the platform and checking it regularly will help you stay organized, keep up with your courses, and navigate your studies with confidence.
What will I use it for?
Your experience in Moodle may differ depending on how your instructor chooses to use it and the delivery method of your course. You may use it to:
How do I use it?
Accessing Moodle
Your Moodle Dashboard
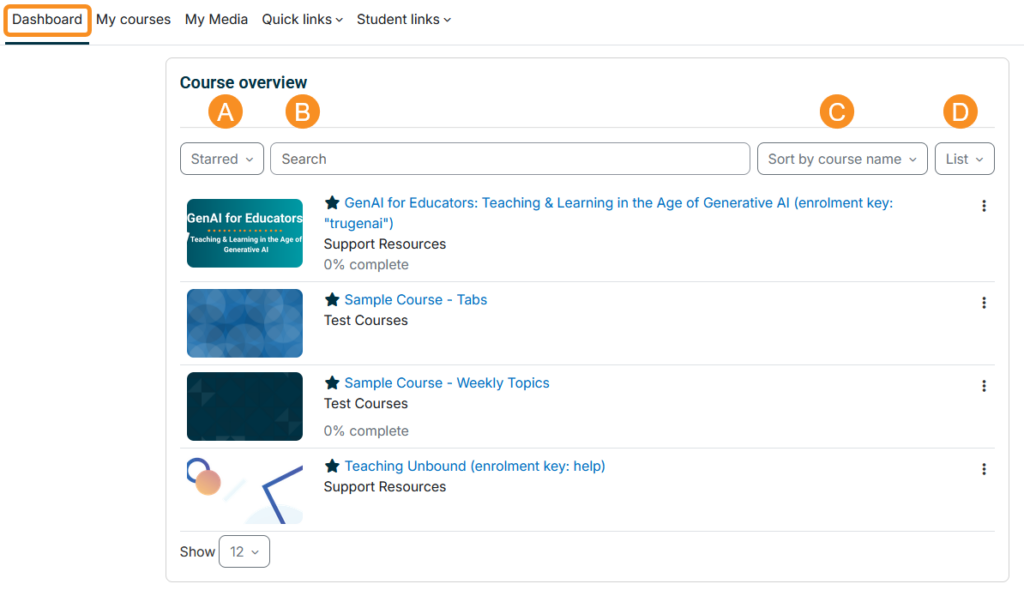
The dashboard is your landing page after logging into Moodle. You will find your available courses in the Course Overview block. You can also access your enrolled courses by clicking on the My Courses link in the header.
The Course Overview block has several options to make it easier to find and sort your courses:
- Sort your courses by All, In progress, Future, Past, Starred, Removed from view
- Search for one of your courses
- Sort your courses by name, last accessed, or start date.
- Display your courses in a card, list, or summary format.
Campus courses: Campus-based courses are made available to students at the discretion of the course instructor, usually during the first week of classes.
Open Learning Courses: Courses offered in a self-paced format usually become available in Moodle within 24 hours after registering, provided there are no delays or additional registration requirements. Be sure to check your TRU student email (opens in a new tab) after registering. Courses offered in a paced format become available in Moodle on the start date of the course.
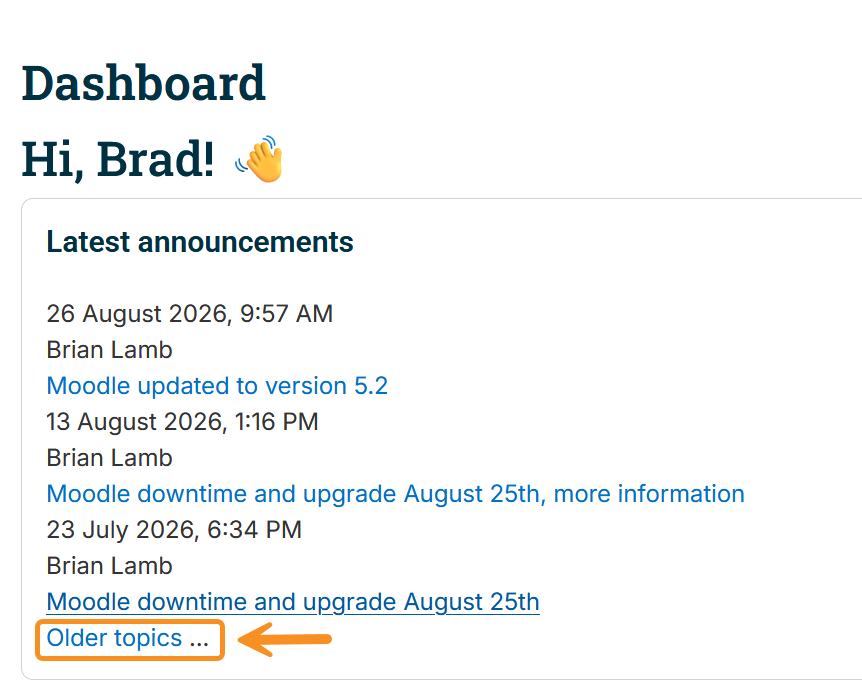
Communication regarding Moodle downtime, maintenance, and upgrades can be found in the Latest Announcements block, located at the top of your dashboard. To subscribe to receive email notifications of posted announcements, click “older topics” and then “subscribe to forum.”
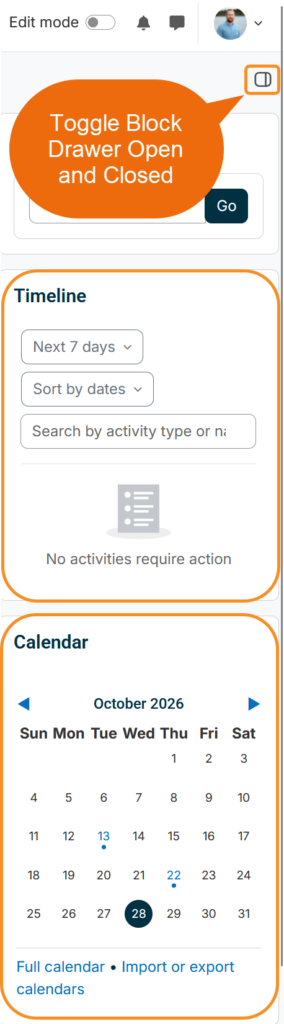
The timeline and calendar blocks found in the collapsible block drawer of your dashboard can help you track and manage upcoming deadlines and events across your courses.
The timeline block provides an overview of upcoming deadlines across all your courses. You can filter activities by due date, including overdue activities, or by activity type, such as assignments and quizzes.
The calendar block allows you to track site, course, group, and personal user events in addition to course deadlines. You can also add your own calendar events, and import or export your calendar.
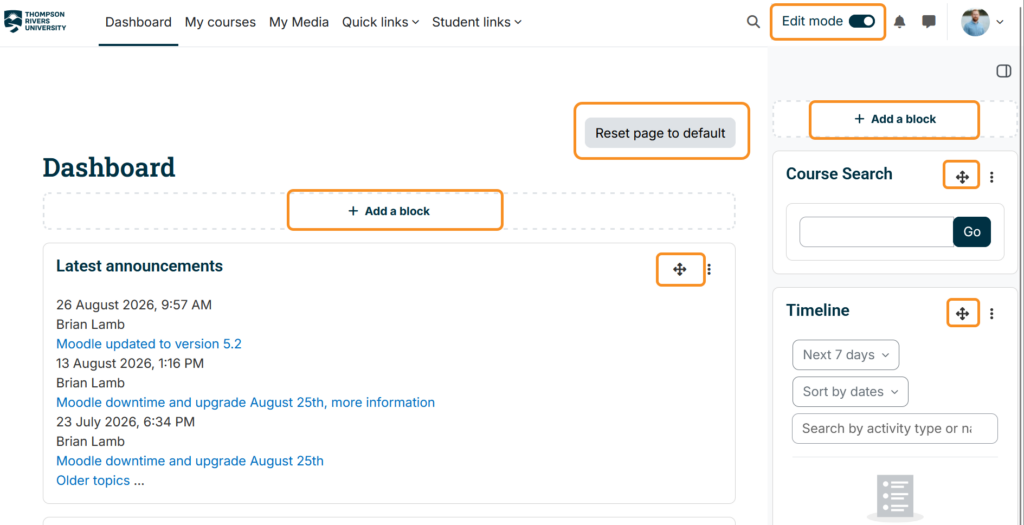
Yes! Moodle’s dashboard is organized into “blocks.” You can move, add, or delete the blocks in your dashboard. First, toggle on edit mode. You can then add a block to the main dashboard area or your block drawer. Click and drag the arrows of a block to move them. Click reset page to default to revert it to its default settings.
Navigating Your Course
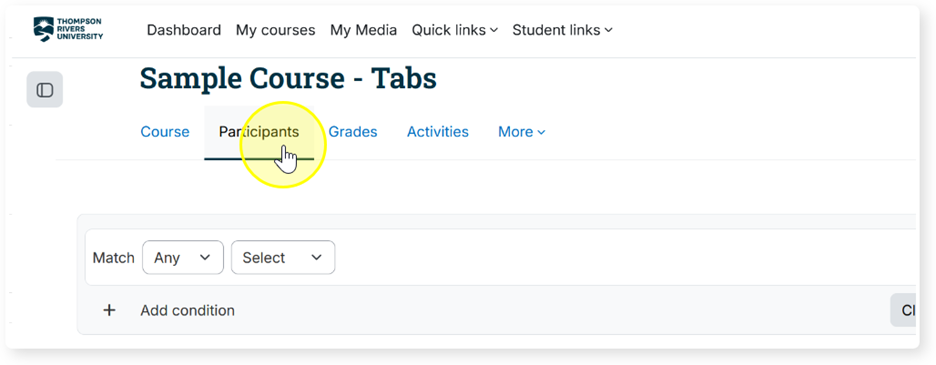
To access the list of enrolled users in your course, click the participants tab below the course title.
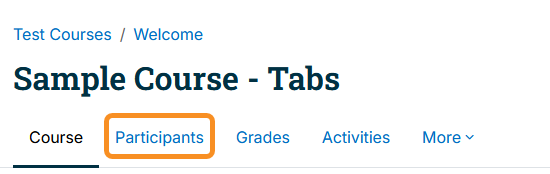
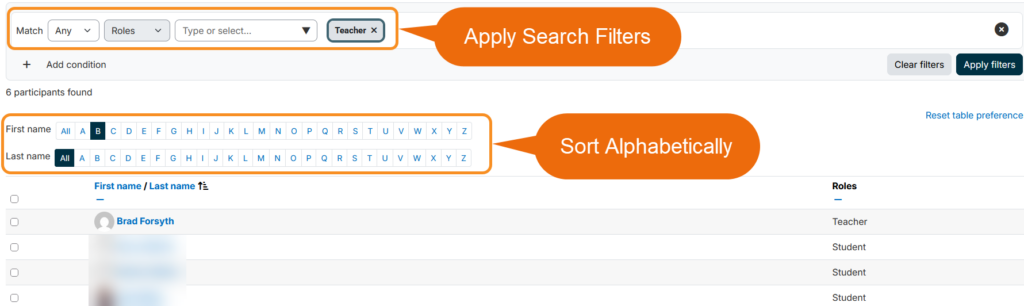
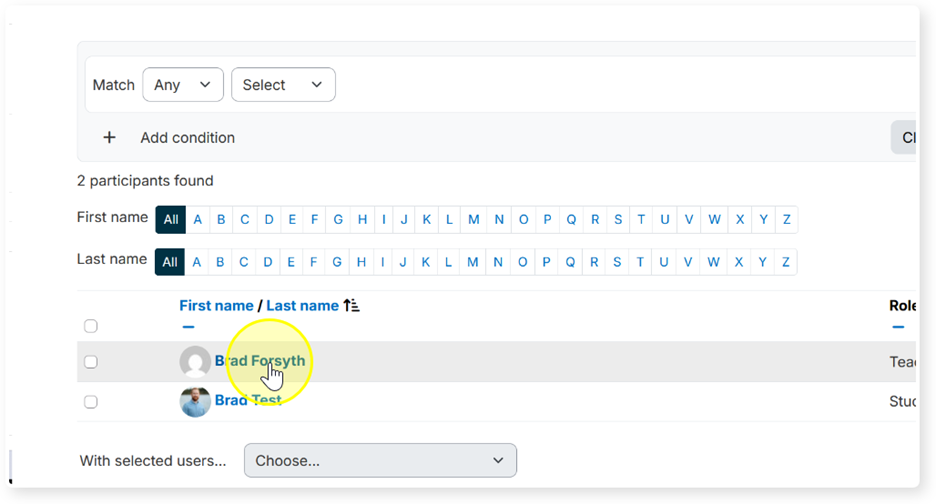
Here you will find a list of everyone enrolled in your course, including their first and last names, roles (student or teacher), and any groups they may belong to. You can apply filters to narrow your search by keyword or role, or sort participants alphabetically by first or last name. Click on a person’s name to access their Moodle profile.
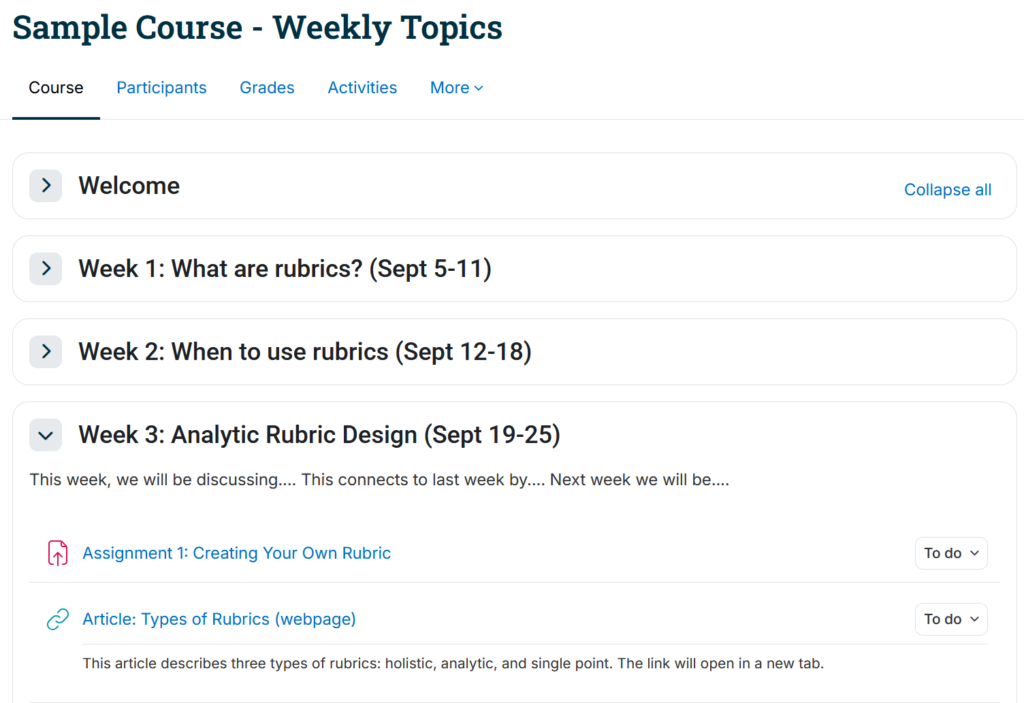
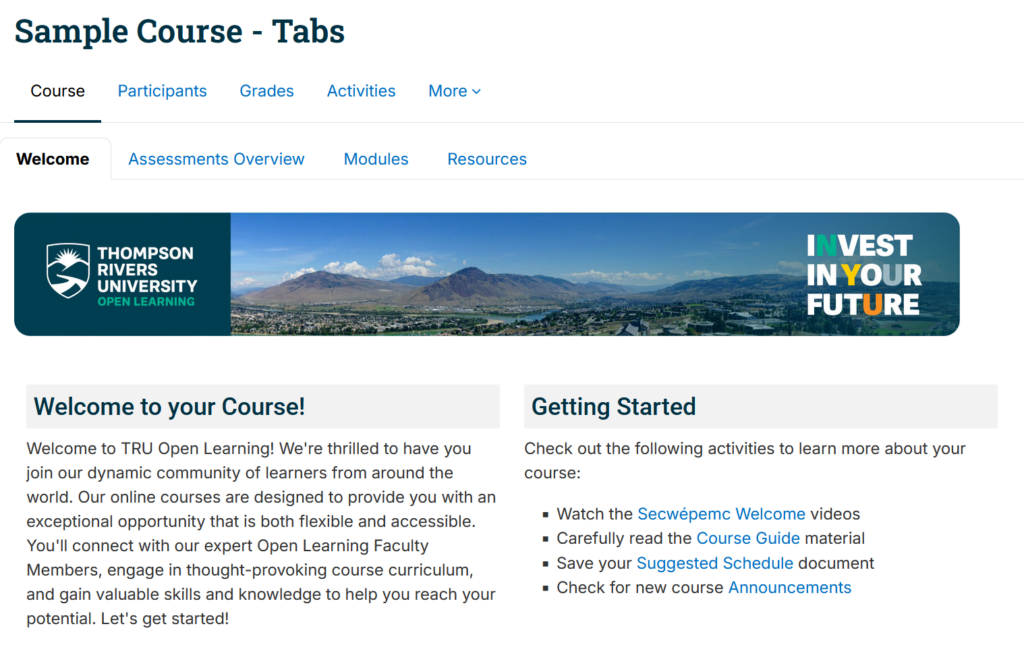
Every instructor organizes their Moodle course differently. Take some time at the beginning of the semester to explore each course and learn where important materials, activities, and information are located. Here are some helpful tips to make navigating your Moodle courses easier, stay organized, and quickly find the information and resources you need.
Moodle courses can use different layouts, known as course formats. Your instructor chooses how course content and activities are organized, such as by week or topic, and displayed, such as in dropdown sections or tabs (commonly used in Open Learning courses). While the layout may differ between courses, Moodle’s main features and activities generally work the same way.
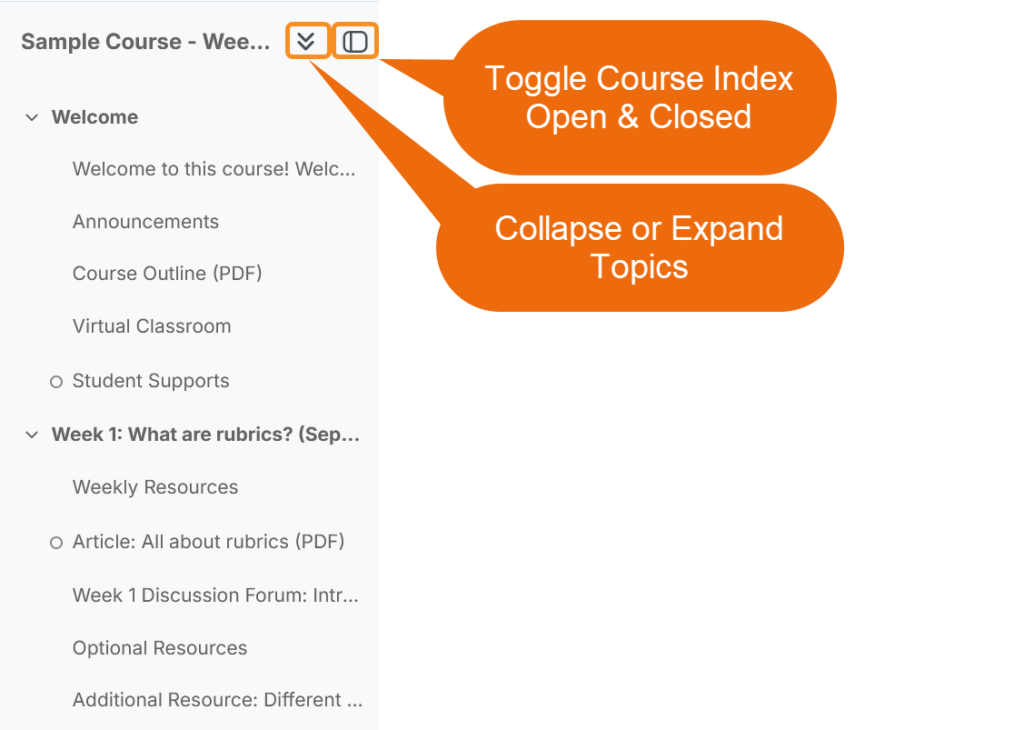
The course index lets you quickly jump between sections and activities without scrolling through the entire course page. Collapse or expand sections in the course index to make navigating even easier.
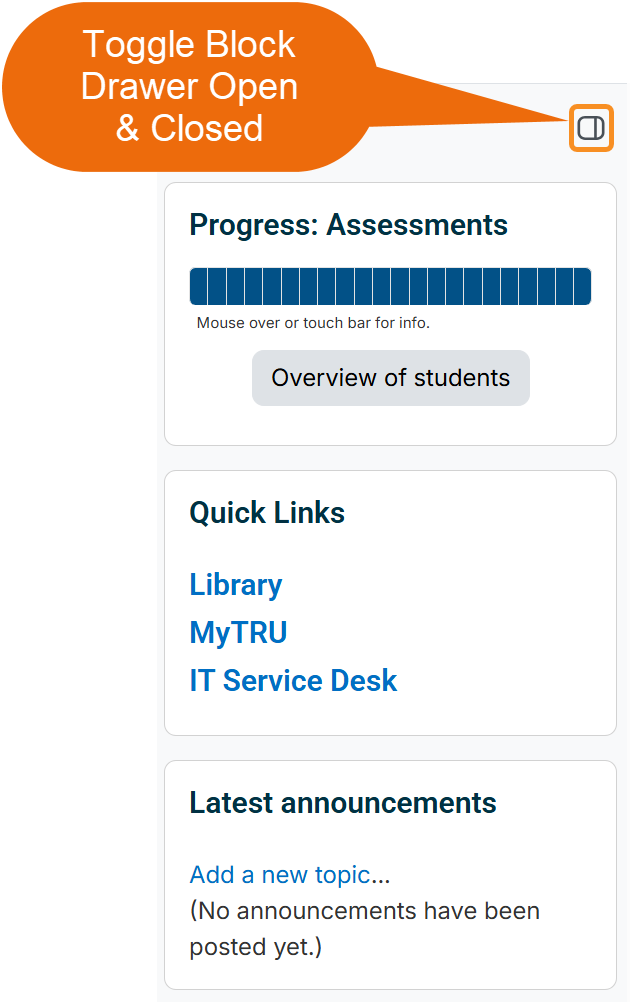
Your instructor may add extra features and resources to the block drawer, such as a progress bar to track your course activities, important links, or recent course announcements.
Some activities may display due dates or dates when they become available. They may also have completion requirements that show what you need to do before an activity is marked as complete, such as viewing it, submitting work, or receiving a grade.

Remember, you can also keep track of upcoming due dates using the Timeline and Calendar on your Moodle dashboard.
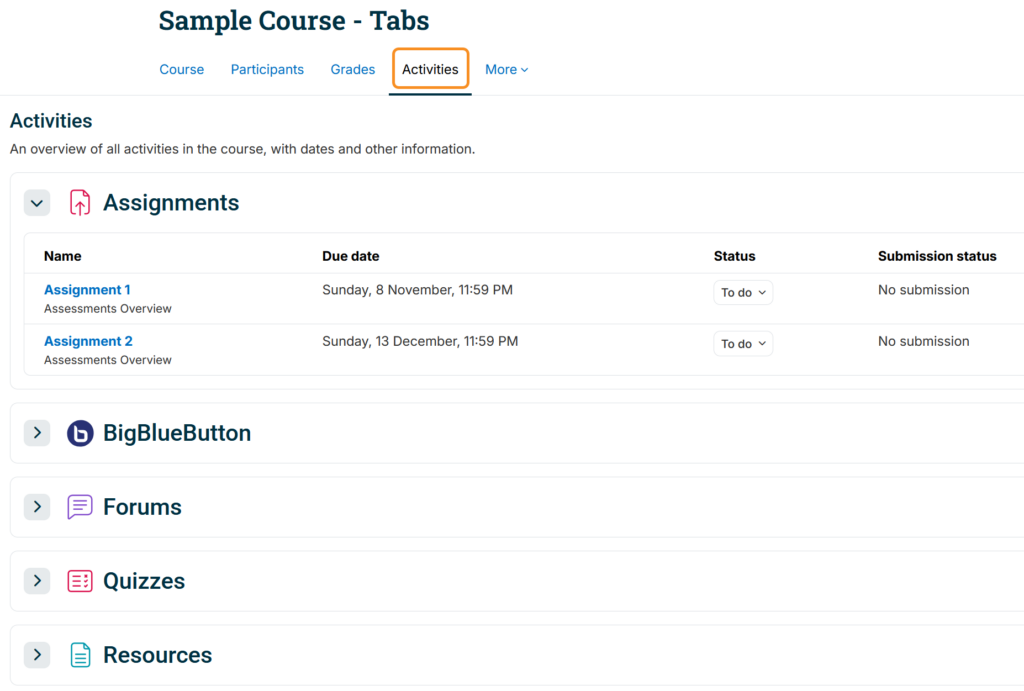
The Activities tab, located below the course title, provides an overview of all activities and resources in your course. You can view important information, such as due dates, completion requirements, and submission status. You can also quickly access individual activities and resources without having to search through your course page.
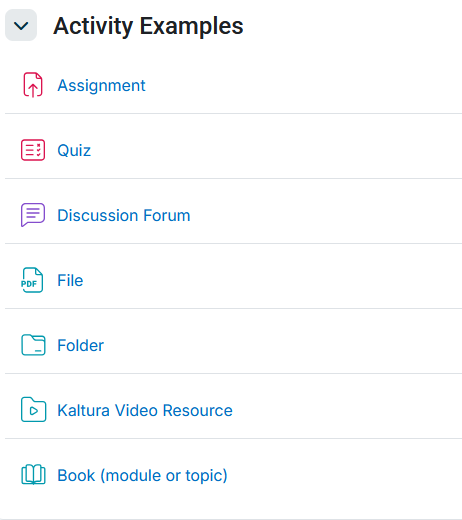
Activities and resources in Moodle include colour-coded icons to help you easily identify them. There are many different activity and resource types that your instructor can choose from. Some of the most common ones are highlighted below.
- Assignment: Where you submit work (files, typed text, or video) for your instructor to grade and give feedback on. You can see due dates, submission status, and your grade here.
- Quiz: An online assessment made up of question types like multiple choice, true/false, or short answer, often with a time limit. Depending on your instructor’s settings, you may see your score and feedback.
- Discussion Forum: A space for posting messages and replying to classmates and your instructor. It’s used for building online community, class discussions, debates, and sharing reflections on what you’re learning.
- File: A single document your instructor shares, such as a PDF, slide deck, or reading, which you can open or download.
- Folder: A container that groups several related files together (for example, all the slides for one week), so you can browse and download them in one place.
- Kaltura Video Resource: An uploaded video, such as a recorded lecture or tutorial, that you can watch directly in Moodle.
- Book: A multi-page resource organized into chapters and subchapters, that you navigate using a table of contents or next/previous buttons. It is predominantly used in Open Learning courses to organize course modules or topic content in one place.
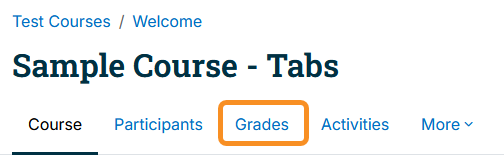
To access your grades, click the grades tab below the course title.
NOTE: Instructors may use Moodle’s gradebook differently. Some grades may not be included, and the grades displayed in Moodle may not accurately reflect your overall course grade. Check the myTRU Student Portal (opens in new tab) for your official grades.
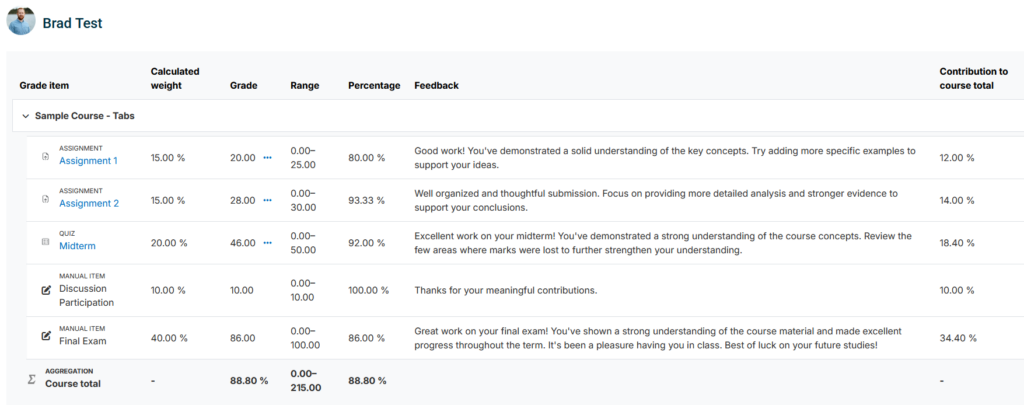
Your instructor determines what grading information is visible to you in Moodle. Depending on your course, you may see some or all of the following:
- Calculated weight: Shows how much a grade item contributes to your overall course grade.
- Grade: Shows the mark you received for an assignment, quiz, or other graded activity.
- Range: Shows the minimum and maximum possible marks for a grade item.
- Percentage: Shows your grade as a percentage of the total possible marks.
- Feedback: Displays comments or suggestions provided by your instructor.
- Contribution to course total: Shows how much a grade item contributes to your overall course grade based on your mark and its weight.
Your Profile and Preferences
Every user in Moodle has a customizable profile page that can display some personal details about you, your contact info, and your course activity. Your profile can be accessed by your classmates and instructors.
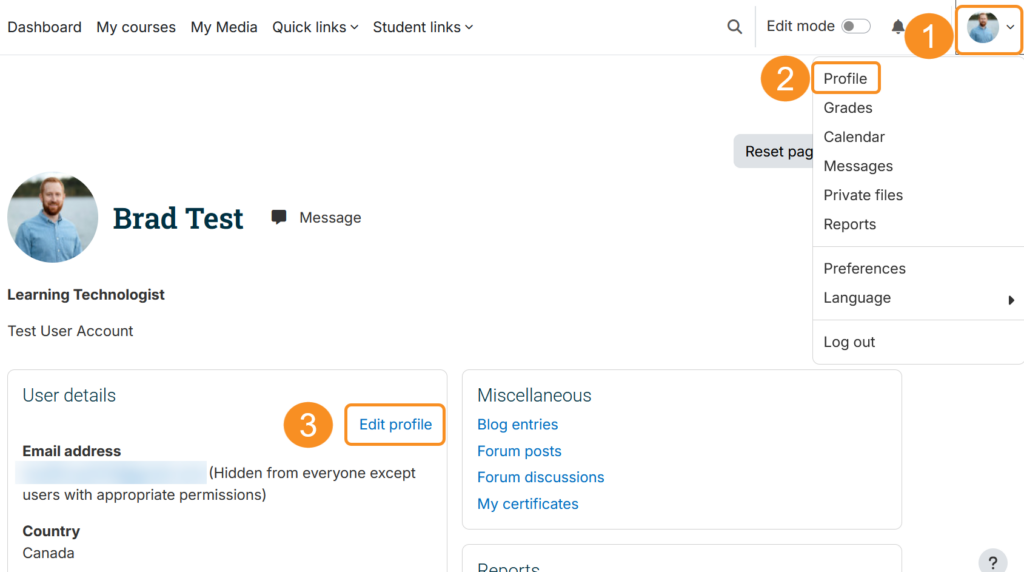
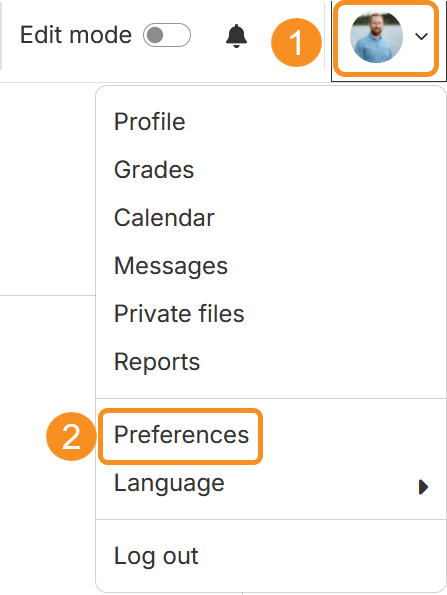
To customize your profile, click the profile icon in the top-right corner, then “Profile,” then “Edit profile.”
There are several ways you can customize your profile.
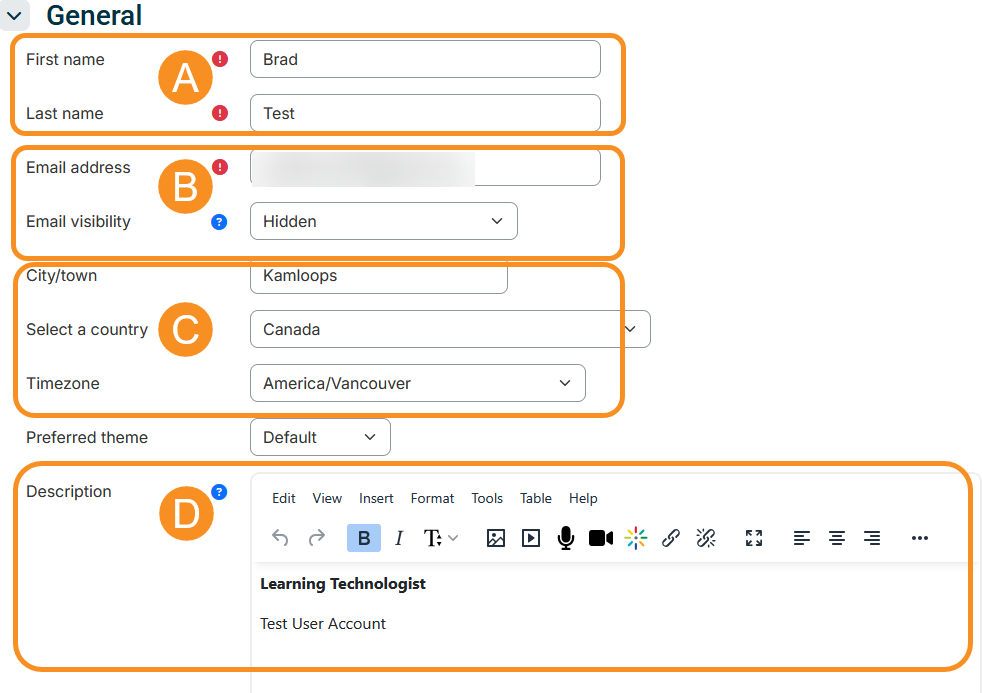
Under the General tab you can:
- Review your first and last name. Note that you may not be able to update this yourself.
- Confirm your email address. All notifications from Moodle (i.e. messages, course announcements, etc.) will be sent here, so ensure it is an email you monitor regularly. Your myTRU student email address will be included as the default email address, and it is recommended that you keep it. Refer to Student Webmail Forwarding (opens in new tab) for instructions how to set up your student email to automatically forward emails to a personal email account.
- Update your location and time zone.
- If desired, include a brief description of yourself for others to view.
Scroll down for the following additional options:
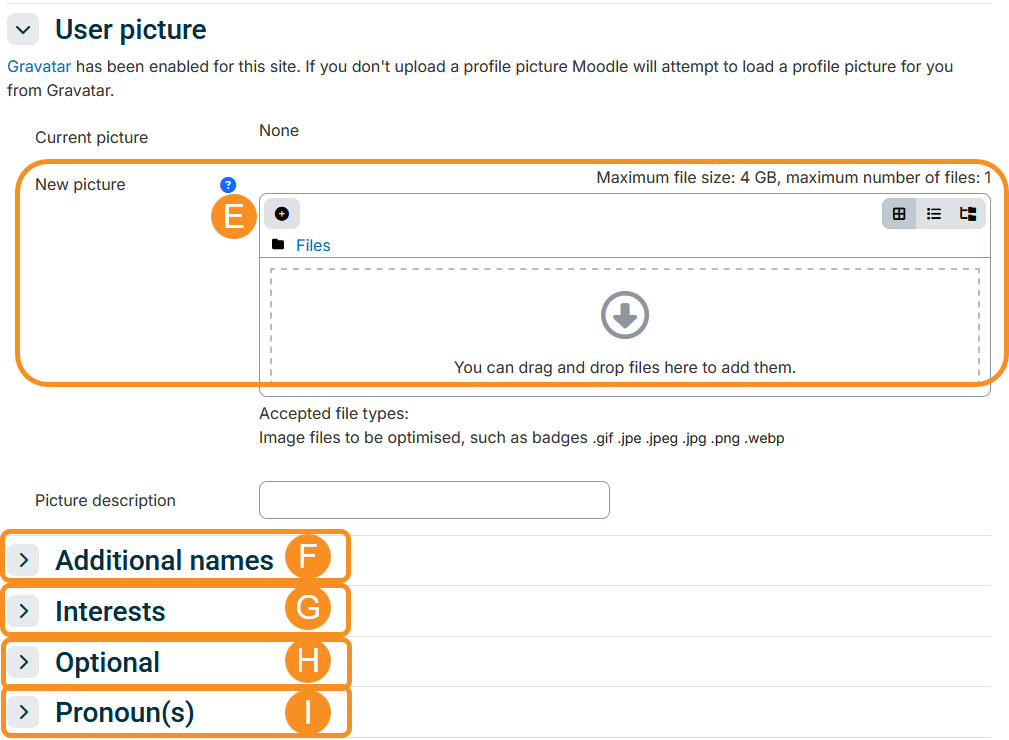
- Upload a picture of yourself for your profile, ideally using .jpeg or .png file formats. If you are not comfortable posting a photo of yourself, you can upload something that is meaningful to you such as a pet or favourite location.
- Add phonetic spelling of your name or a preferred name.
- Add interests to your profile as tags to let others know a bit more about you.
- Under optional, you can add your institution, department, phone number, or address. Keep your privacy in mind and only add additional contact information that you are comfortable sharing with your classmates and instructors.
- Update your pronouns.
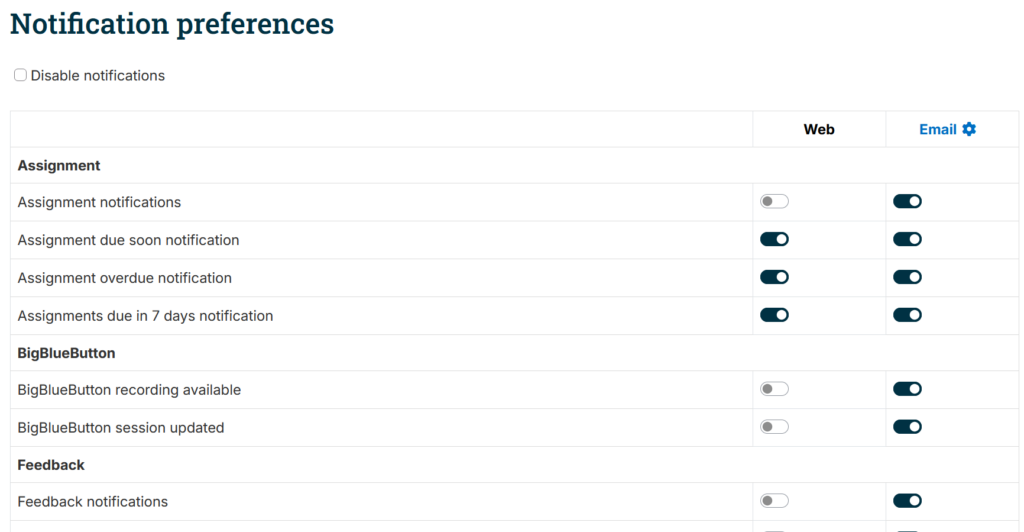
Moodle sends notifications for things like graded assignments, forum posts, and messages. You can customize which notifications you receive by email or on the web (i.e. within Moodle). Review your preferences carefully so you don’t miss important course updates.
To update your notification preferences:
- Click the profile icon in the top-right corner
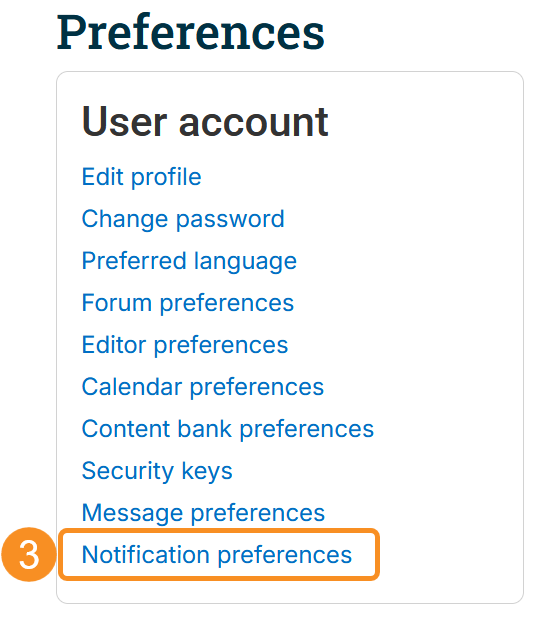
- Click Preferences
- Click Notification preferences
You’ll see a list of activities for which you can turn web and email notifications on or off. Explore the available options to decide how you would like to receive notifications from your courses.
Your forum preferences will determine how you will receive notifications of discussion forum posts in your courses and how you would like to track them.
To update your forum preferences:
- Click the profile icon in the top-right corner
- Click Preferences
- Click Forum preferences
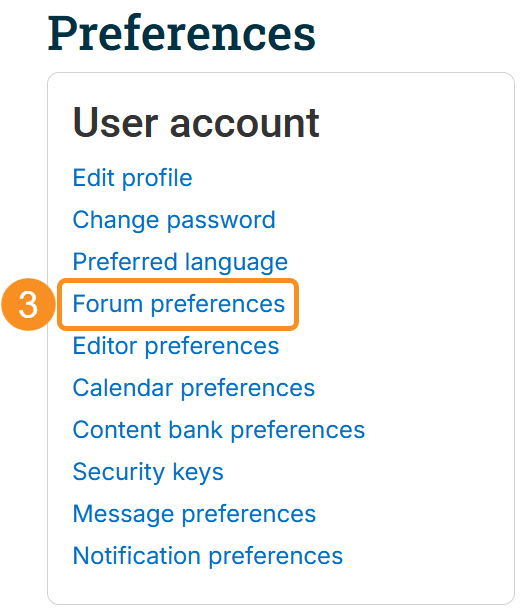
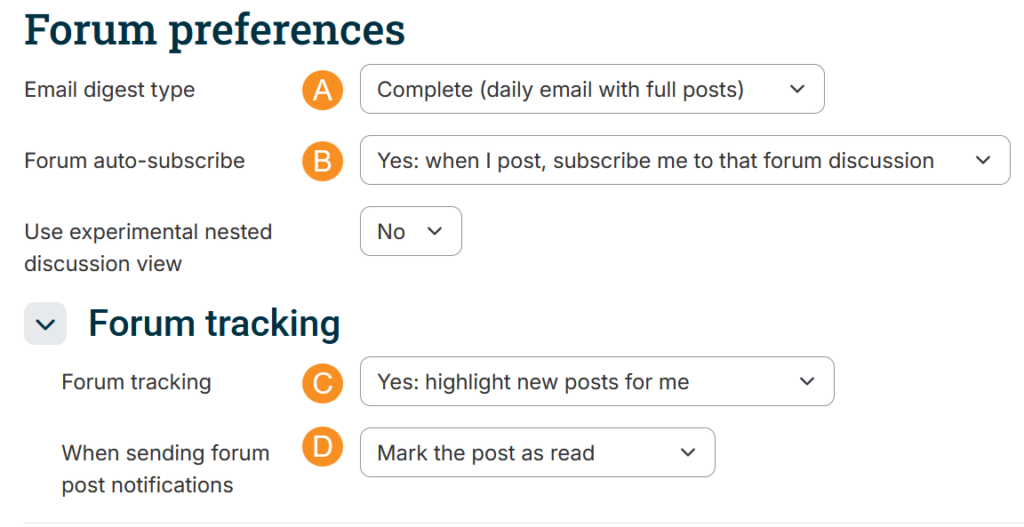
You can customize the following options:
- The email digest type determines how you receive notifications of posts in forums to which you are subscribed, allowing you to receive messages individually or on a daily basis as a digest.
- The forum auto-subscribe setting determines whether you automatically subscribe to a forum after posting to it.
- Forum tracking determines whether new posts that you have not seen are highlighted.
- “When sending forum post notifications“: determines whether posts are marked as read when you are notified of them.
Your message preferences control your privacy settings for who can contact you through Moodle’s messaging system, as well as your email notification settings.
To update your message preferences:
- Click the profile icon in the top-right corner
- Click Preferences
- Click Message preferences
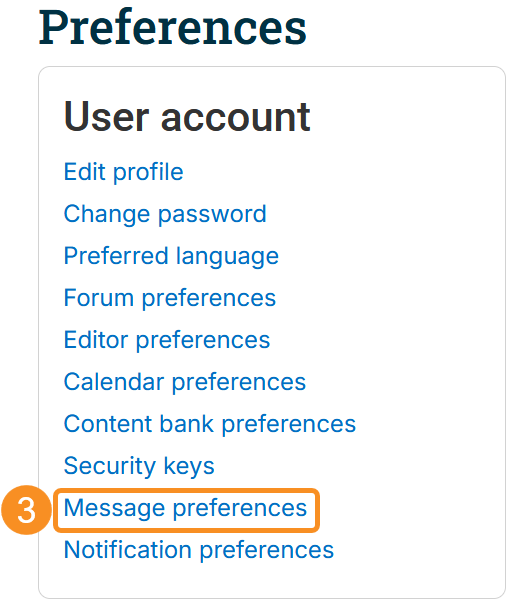
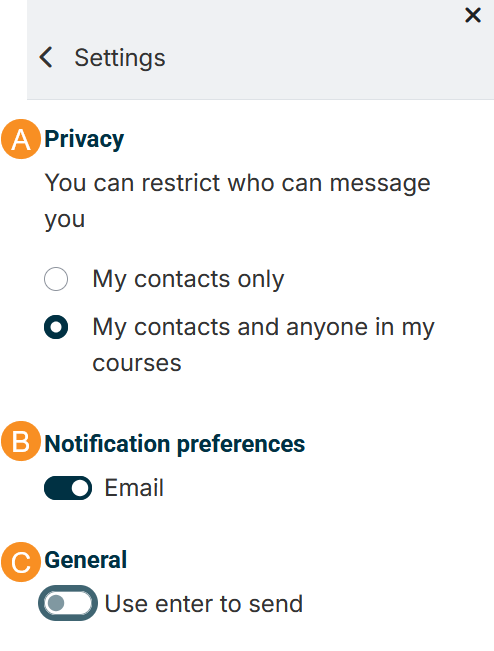
You can customize the following options:
- Privacy: customize who is able to message you
- Notification preferences: Select whether you would like to receive an email notification when you receive a new message.
- General: Control whether selecting “enter” on your keyboard will send a message in the message editor.
Communicating in Moodle
Moodle Messaging is a built-in messaging tool that lets you communicate with classmates and instructors, provided their privacy settings allow it. If you’re part of a group in Moodle, you may also be able to use group messaging. Messages are stored internally in Moodle, but you may also receive email notifications depending on your notification and message preference settings. Always check your instructor’s preferred method of communication, as they may prefer email over Moodle Messaging.
Moodle Messaging can be accessed via the messaging drawer or the full-screen messages page.
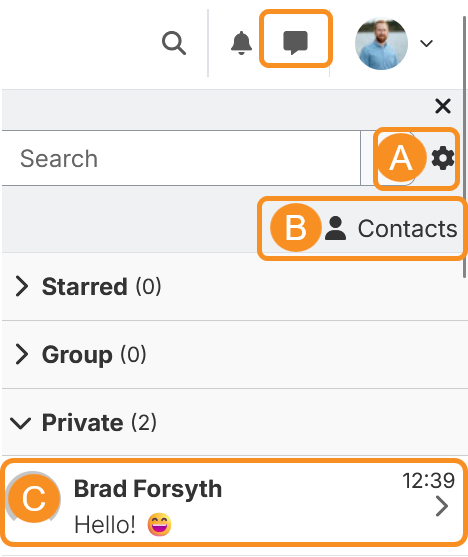
To access the messaging drawer, simply click the message icon in the top-right corner. From here you can:
- Configure your message preferences. See “How do I update my message preferences?”
- View, manage, and message your contacts. This is relevant if your privacy settings restrict messages to contacts only.
- Access and respond to messages. Organized by starred messages, group messages, and private messages.
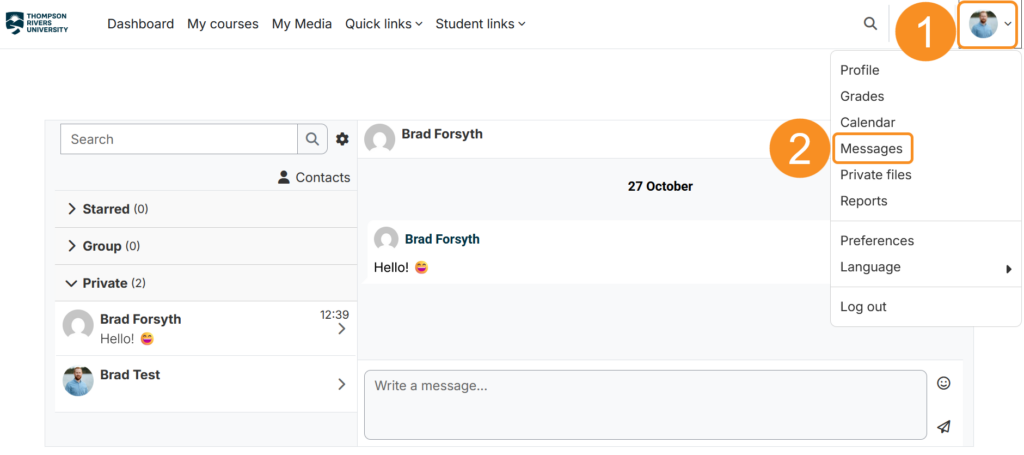
To access the messages page, select your profile icon in the top-right corner and then Messages. Here you can access the same features detailed above but in a full-screen format.
You can message existing contacts or group members via the messaging drawer or messages page, as detailed above. The following steps will outline how you can find and message your classmates or instructor.
1. Click the Participants tab in your course.
2. Click the name of the person you would like to message to access their Moodle profile.
3. Click Add to contacts if you would like to request to add them as a contact. Note that this may be required to message them depending on their privacy settings.
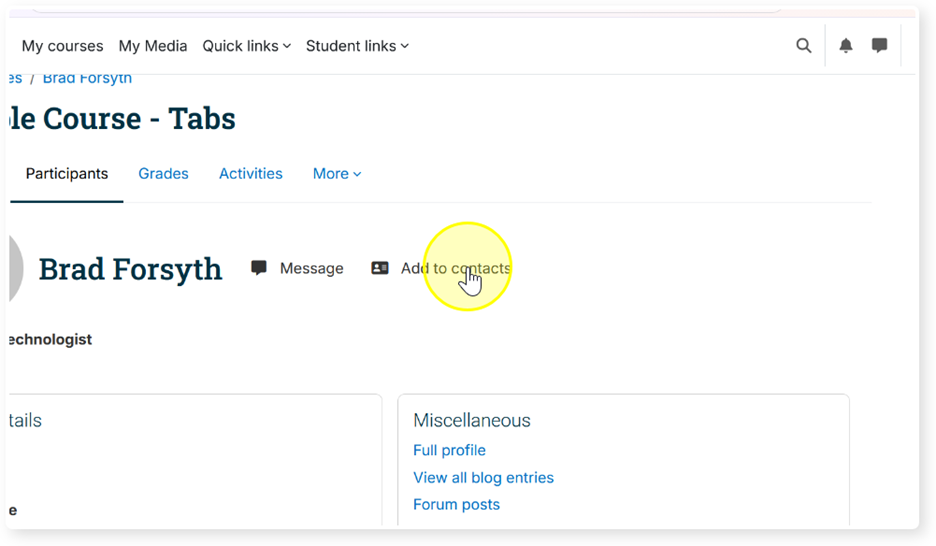
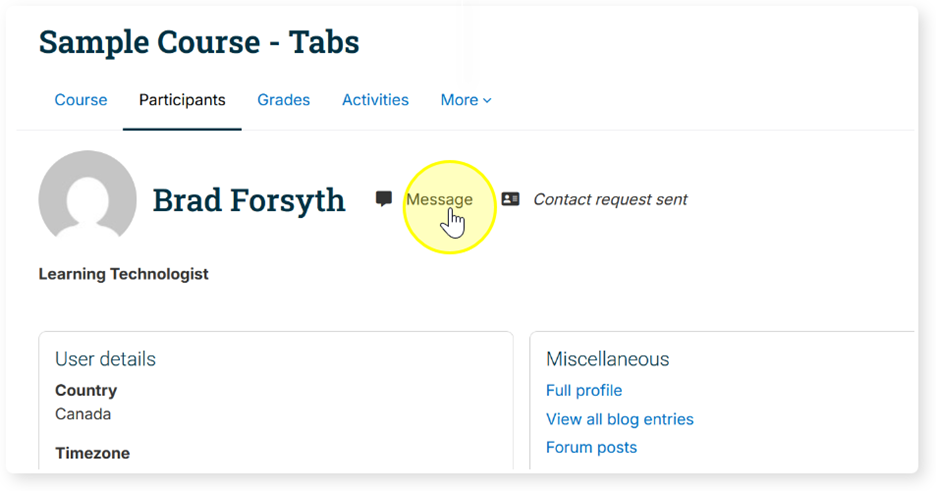
4. Click Message to send them a message.
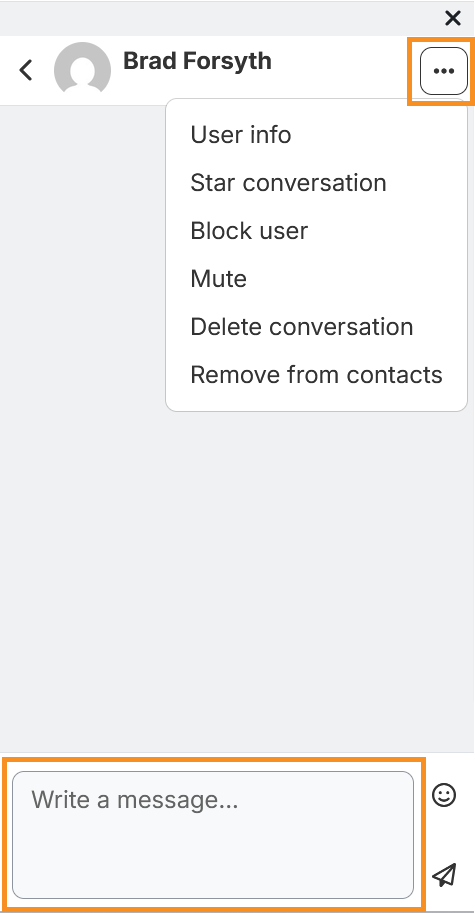
5. This will open the messaging drawer. Type your message in the text box located at the bottom. Click “…” to open additional options to manage the conversation.
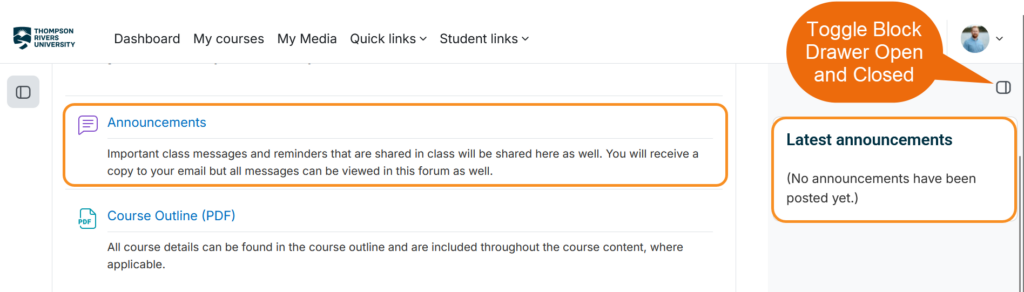
Your instructor/Open Learning Faculty Member will likely make use of Moodle’s announcements forum. This forum is included in all courses by default, and is usually located near the top of your course. Only an enrolled teacher can post to this forum. All students are automatically subscribed, meaning you will receive an email notification when an announcement is posted. Notifications are sent to the email address on your Moodle profile (Refer to “How do I update my Moodle profile?”).
Click on the announcements forum to access all posted announcements. Your course may also include a latest announcements block in your collapsible block drawer that will display recent announcements.
Depending on the delivery format of your course, you may be required to attend live class sessions online, or perhaps your instructor hosts virtual office hours. There are a number of virtual classroom tools available to your instructor, but the one that is integrated directly into Moodle is BigBlueButton. To access your virtual classroom, look for this icon in your course (the title of the activity may differ):

After you have clicked on the activity, click join session. If you are unable to join, double check if there is a specific meeting time for the session. It is possible that your instructor has not yet made the session available. If your instructor has recorded any previous sessions, they will be displayed at the bottom of the activity for you to view at any time.
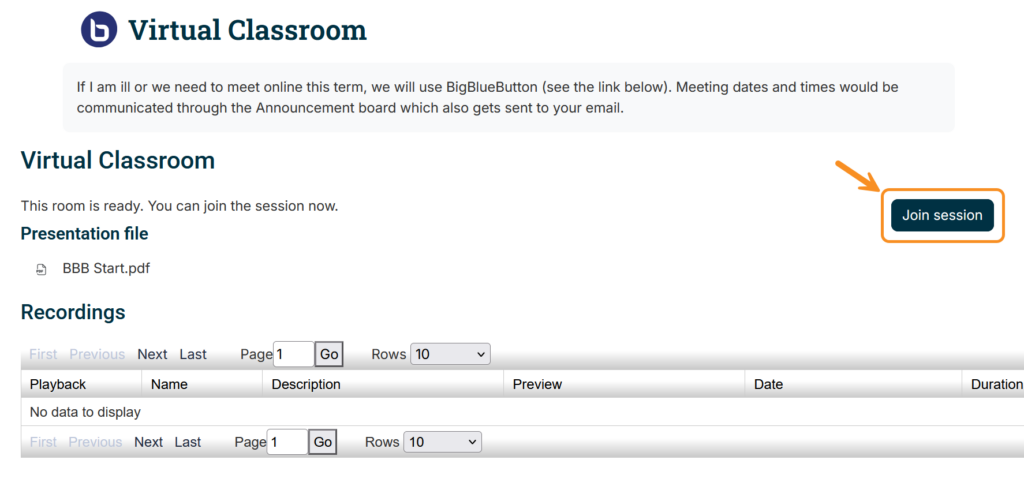
Watch the following video for an overview of how to use BigBlueButton.
Completing Assessments & Activities
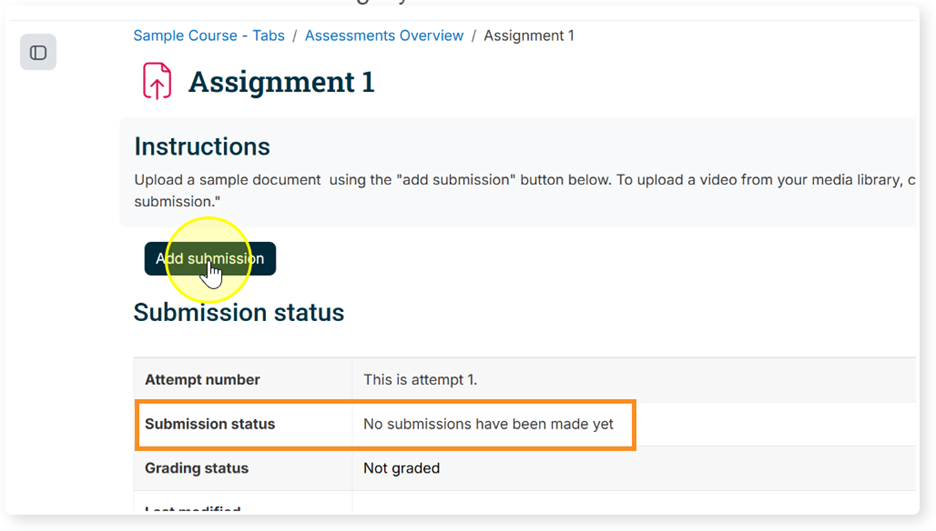
Moodle’s Assignment activity is where you’ll find instructions and deadlines for an assignment, submit your work (usually as a file, such as a Word document, PDF, Excel spreadsheet etc.), and view your grade and instructor feedback.
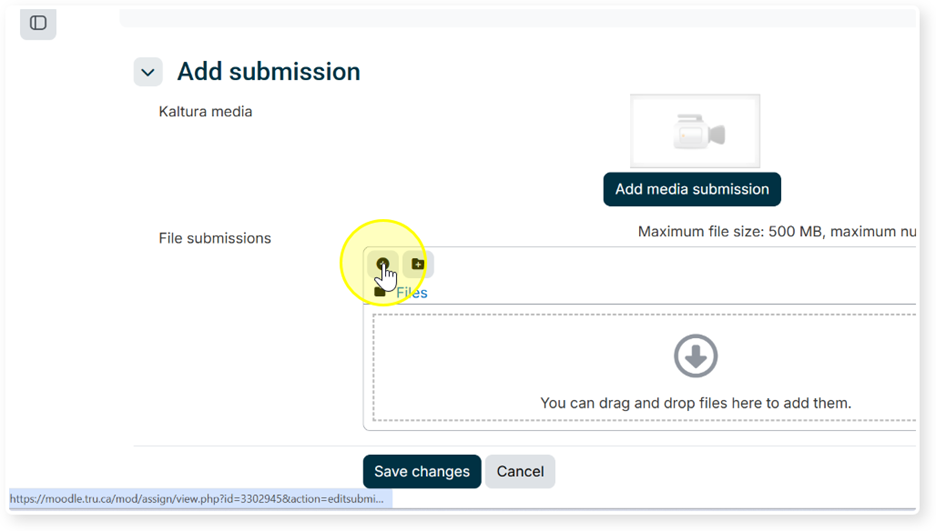
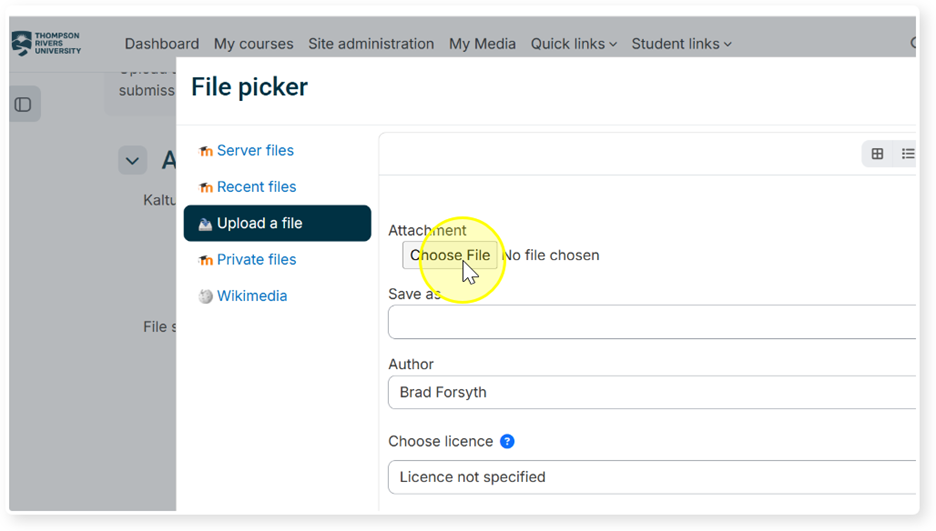
The following instructions detail how to submit an assignment file. Click on each image to enlarge it.
- Your submission status will indicate “No submissions have been made yet.” Click “Add submission” to begin your submission.
2. Next, you will be asked to upload your assignment file. This space may indicate if a specific file type is required and will note the maximum file size accepted. Click the “Add File” icon or drag and drop your file in the space provided.
3. Click “Choose File” and locate your file on your computer.
4. Click “Upload this file”
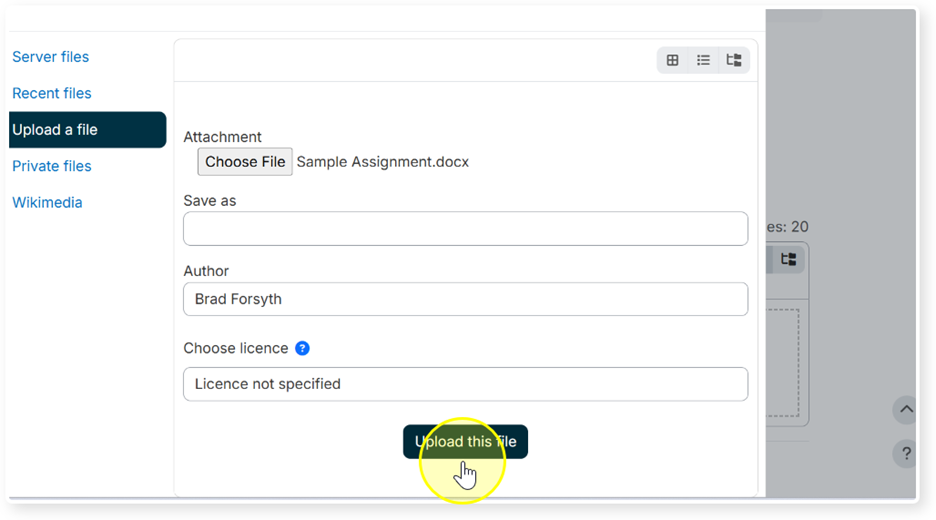
5. Click “Save changes”
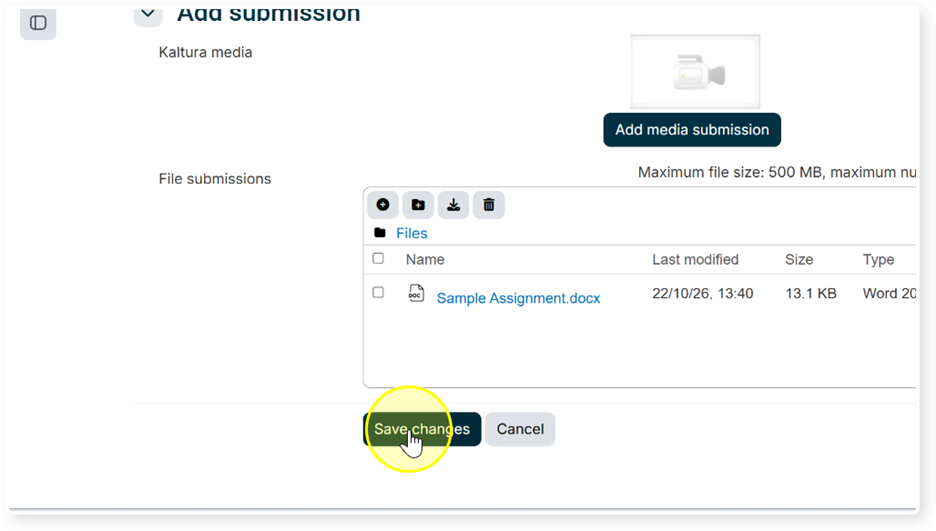
6. Your submission status will update to “Draft.” This means your assignment has not been submitted. Click “Submit assignment.”
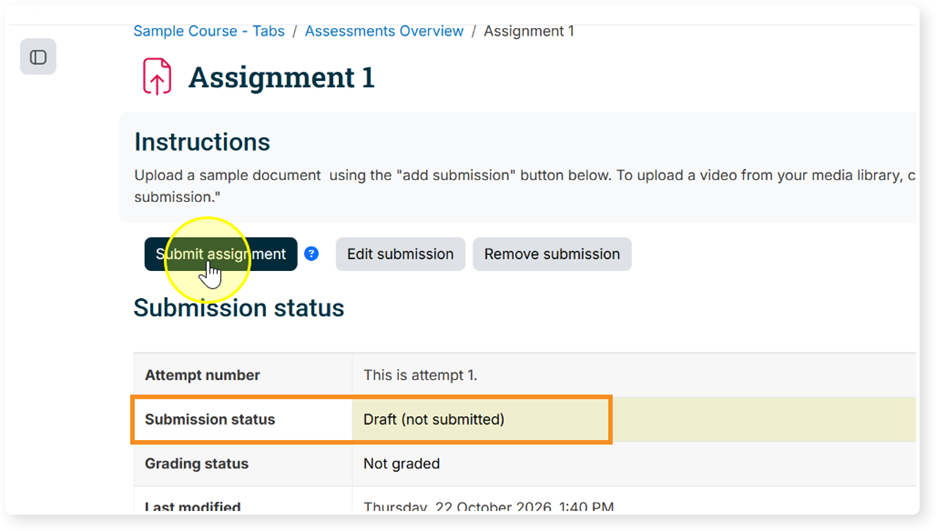
7. To confirm your submission, self-declare that your assignment is your own work by selecting the declaration checkbox, then click “Continue.”
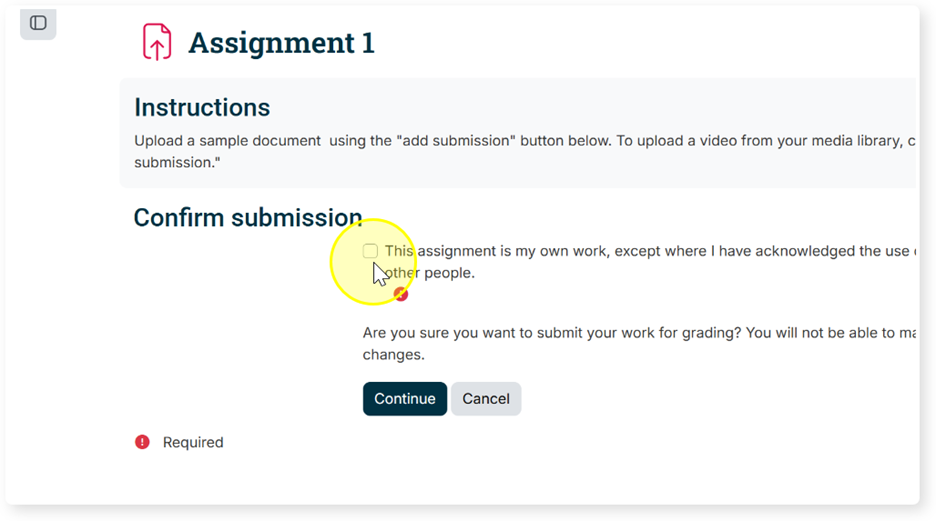
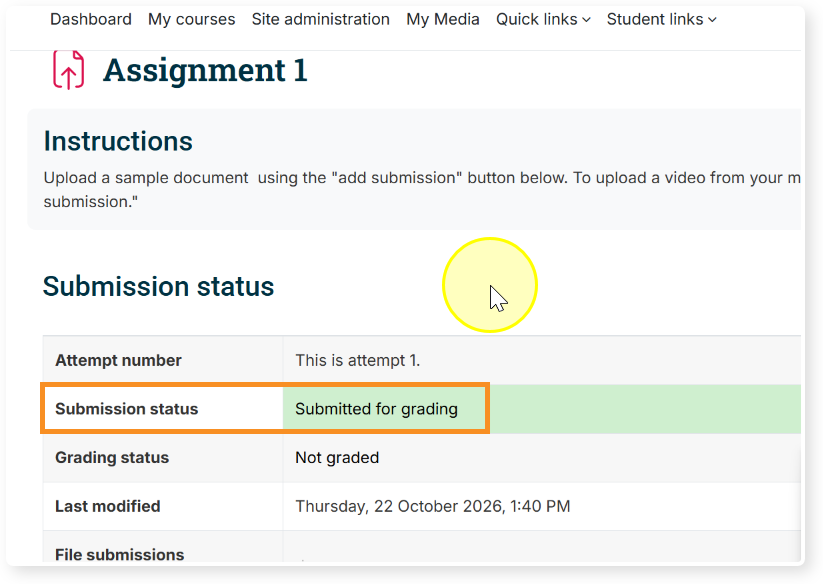
8. Your submission status should now indicate “Submitted for grading.”
With our Kaltura Media service, you can upload an existing video file or record a new video directly in Moodle. Your video can then be shared with your peers through a discussion forum or submitted privately to your instructor through an assignment activity. Completing a video assignment in Moodle is done in two distinct phases: (1) upload an existing video file or record a new video using Kaltura Media, and (2) share or submit your video to an activity.
To access Kaltura, select “My Media” from the header menu. This is your personal media library. It can be accessed from anywhere in Moodle. Select “Add New.”
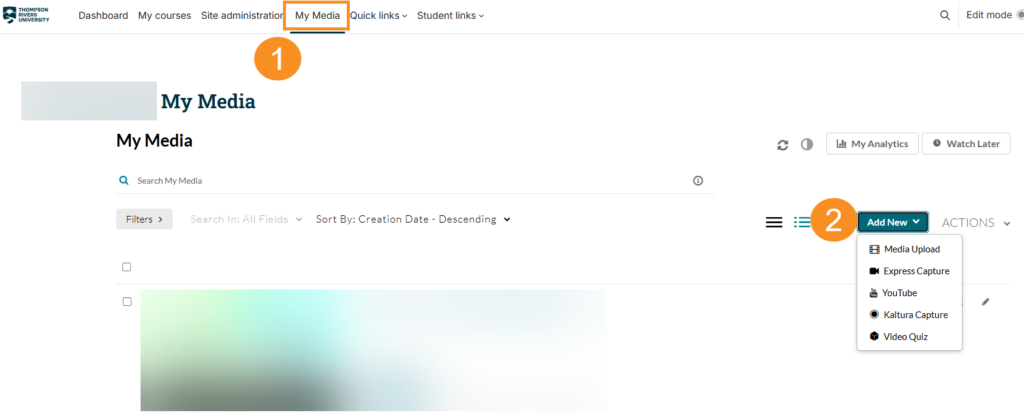
There are three options to pay attention to:
- Media Upload: upload an existing video file from your computer
- Express Capture: quickly record your webcam and microphone
- Kaltura Capture: record your webcam, microphone, and computer screen (download required)
If Media Upload is selected, you will be prompted to select a file from your computer. Be sure to save your changes. For guidance on recording new videos, refer to our Kaltura Tutorials for Students video playlist.
You may be asked to share your video to a discussion forum activity, to be viewed by your classmates. The following steps will outline how to do so.
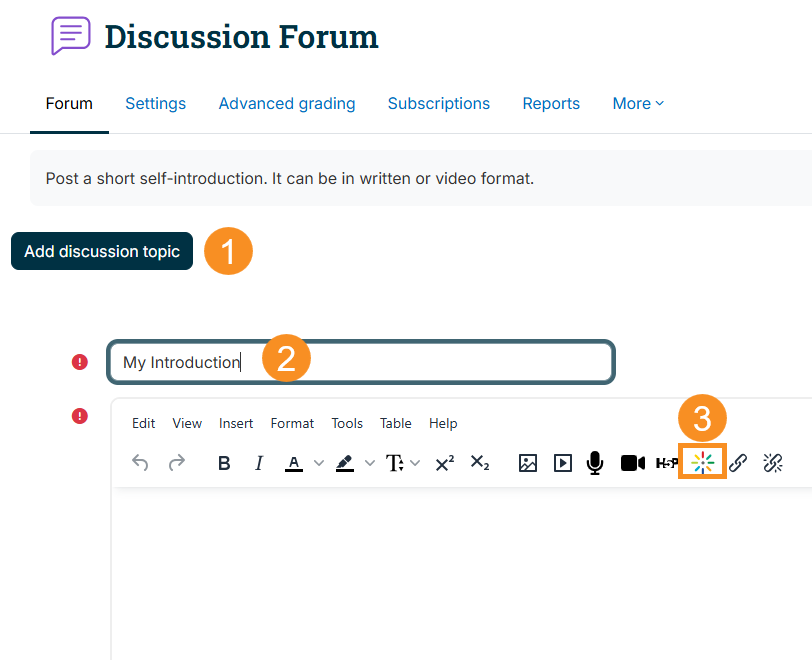
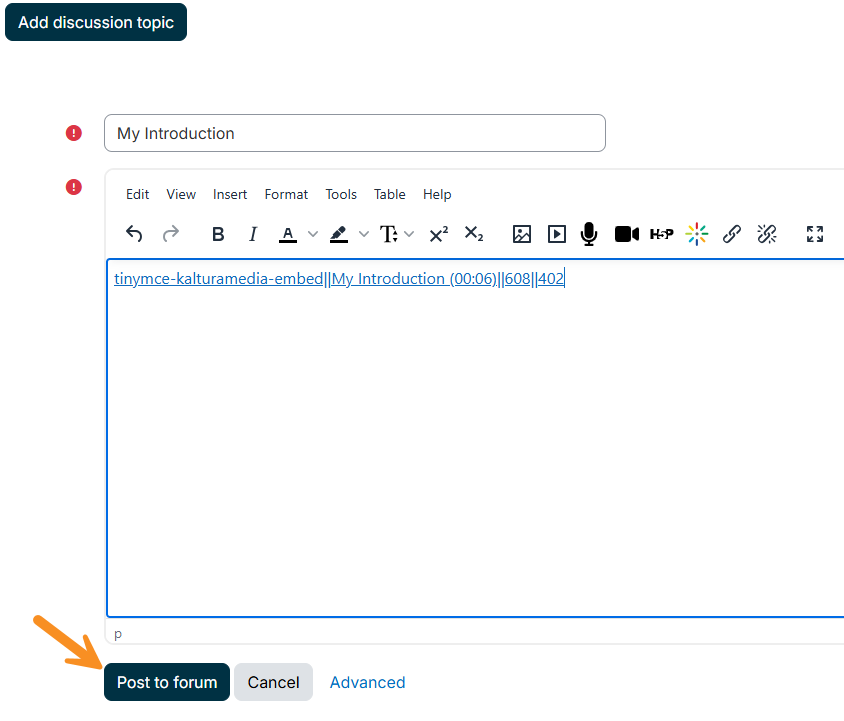
1. In the discussion forum, click the “Add discussion topic” button. Give your post a subject (e.g. “My Introduction”). In the text editor, click on the “Embed Kaltura Media” button.
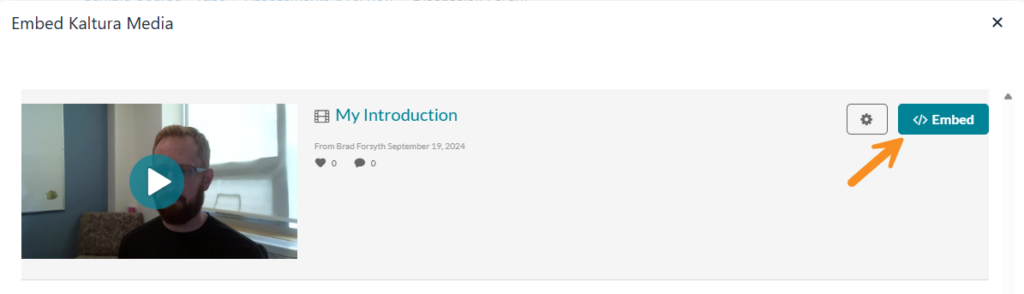
2. Find your video in your My Media list, and click “Embed.”
3. You will see the embed code in the text editor. Click “Post to forum” to share your video.
Alternatively, you may be asked to submit your video to an assignment activity. The following steps will outline how to do so. Click on each image to enlarge it.
1. Your submission status will indicate “No submissions have been made yet.” Click “Add submission” to begin your submission.
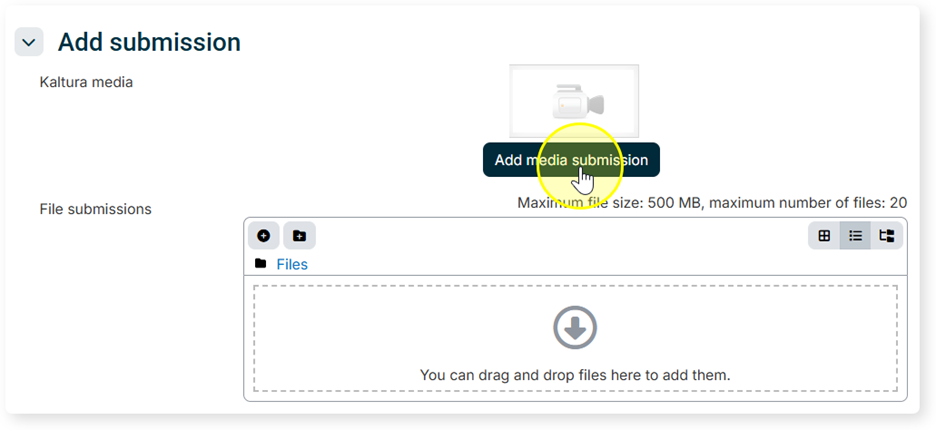
2. Click “Add media submission.”
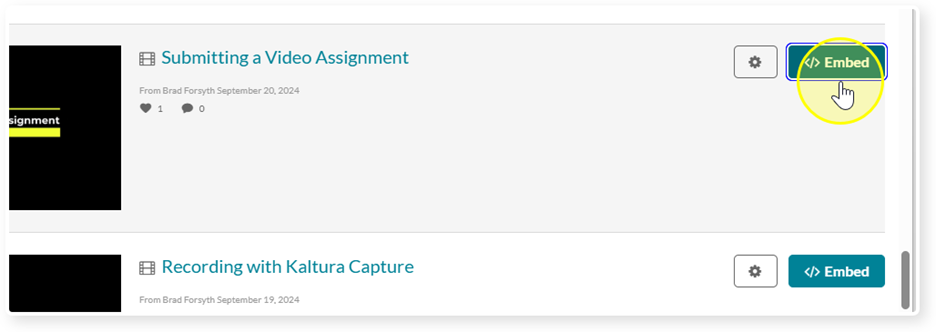
3. Locate the relevant video from your My Media list and click “Embed.”
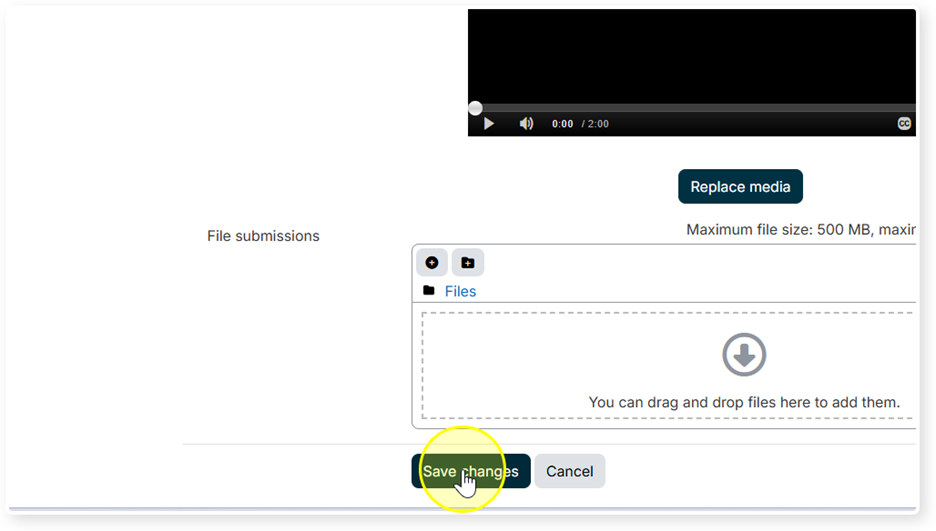
4. Click “Save changes”
5. Your submission status will update to “Draft.” This means your assignment has not been submitted. Click “Submit assignment.”
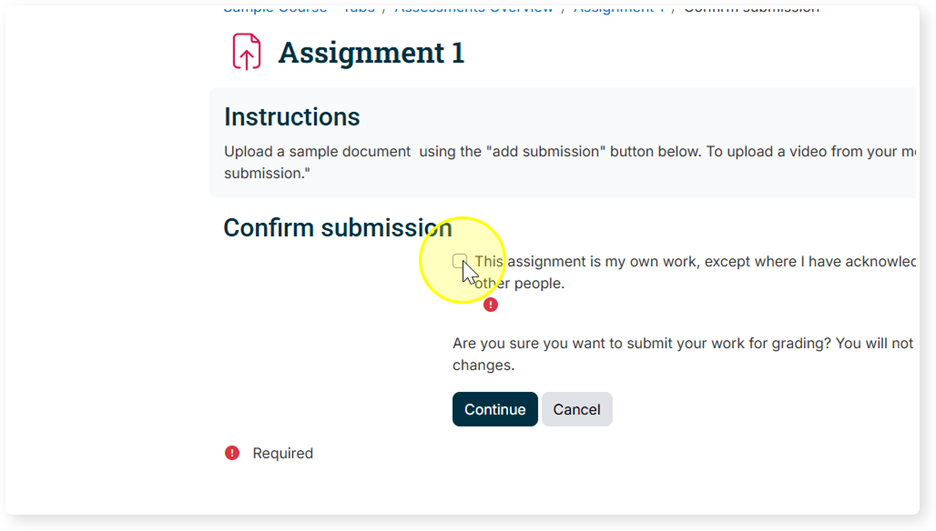
6. To confirm your submission, self-declare that your assignment is your own work by selecting the declaration checkbox, then click “Continue.”
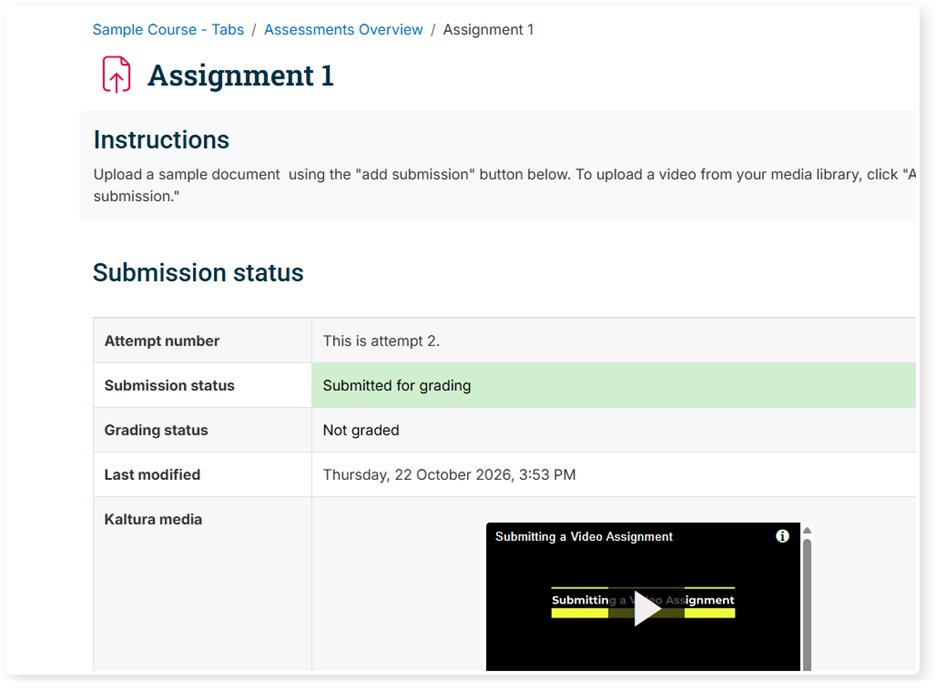
7. Your submission status should now indicate “Submitted for grading.”
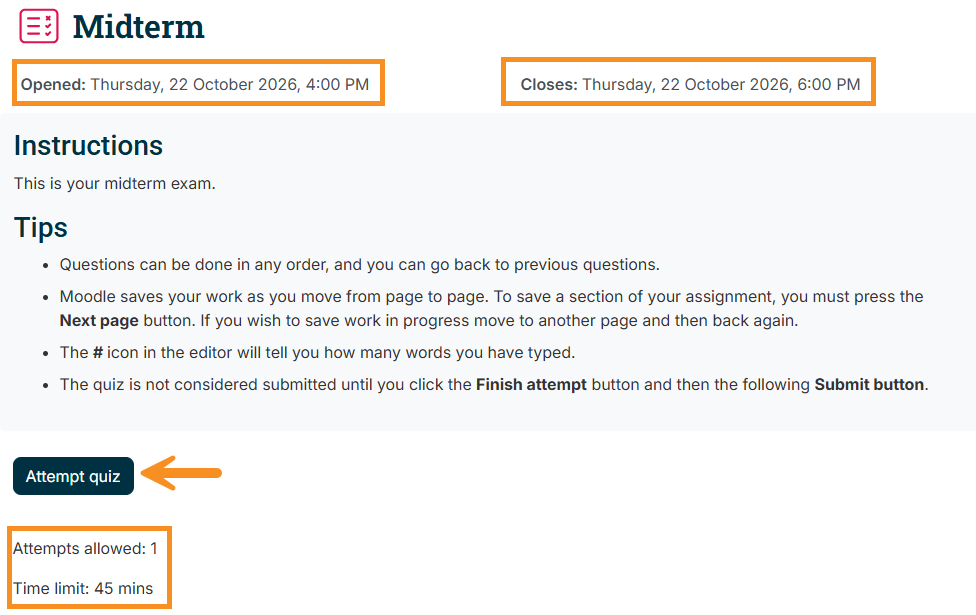
Moodle’s quiz activity is where you will complete timed assessments. These may be graded or ungraded, and questions come in a variety of different types.
1. In the quiz activity you will find relevant information regarding the quiz, such as the start and close date, the number of attempts allowed, and the time limit. Click “Attempt quiz” to begin the quiz.
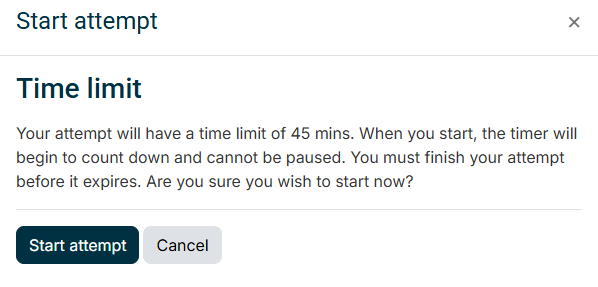
2. When you are ready, click “Start attempt” in the pop-up window to confirm.
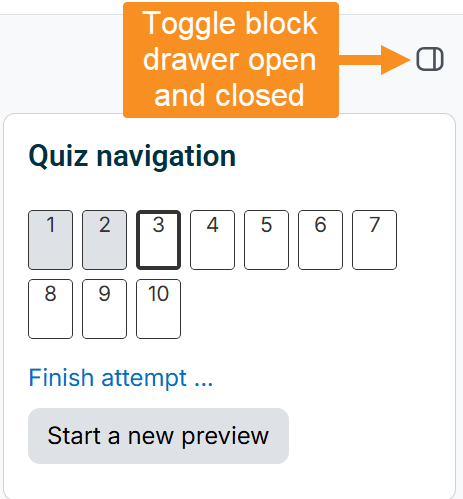
The quiz navigation block located in the block drawer tracks which questions you have answered. The Block Drawer can be toggled opened and closed. Click on a question to quickly jump to its location or use the “Previous Page” and “Next Page” buttons located on the bottom of each page of the quiz.
NOTE: Moodle automatically saves your responses each time you navigate to a new page in the quiz.
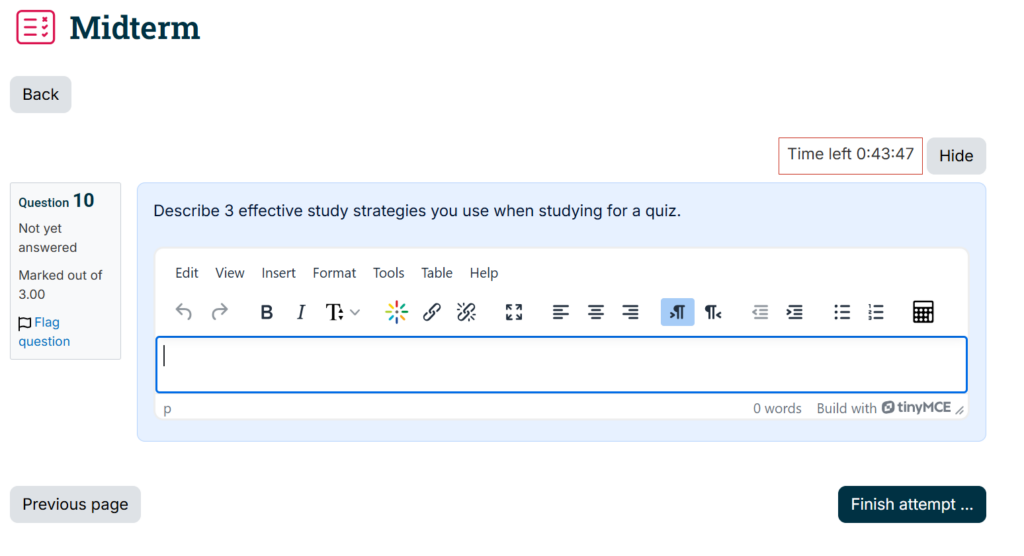
To the left of a question, you will see a box indicating the question number, the maximum number of marks that can be received for the question, and an option to flag the question. Flagged questions will have a “red corner” in their box in the navigation panel. The time left on your quiz attempt will be displayed above the question on each page of the quiz.
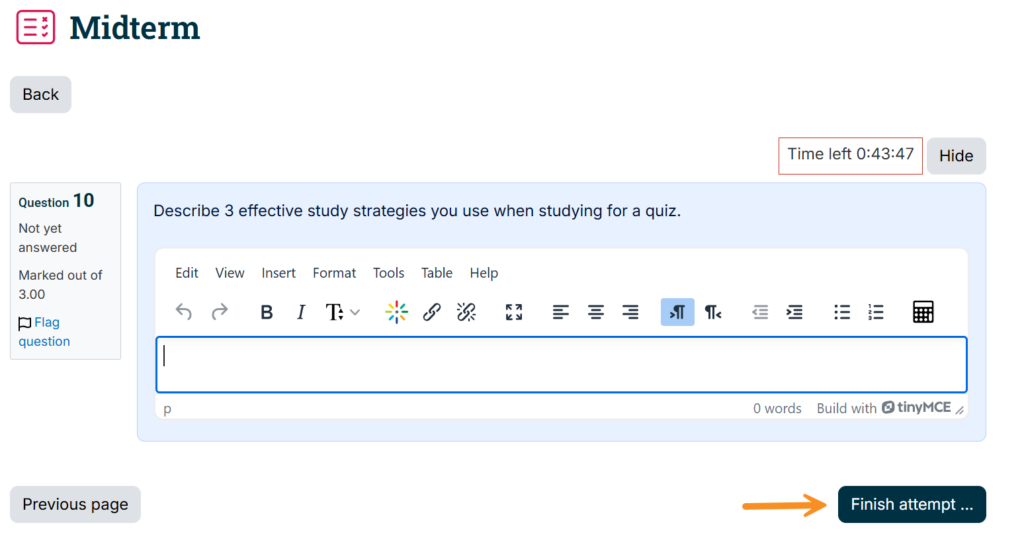
1. Once all questions have been answered, select the “Finish Attempt” button on the last page of the quiz.
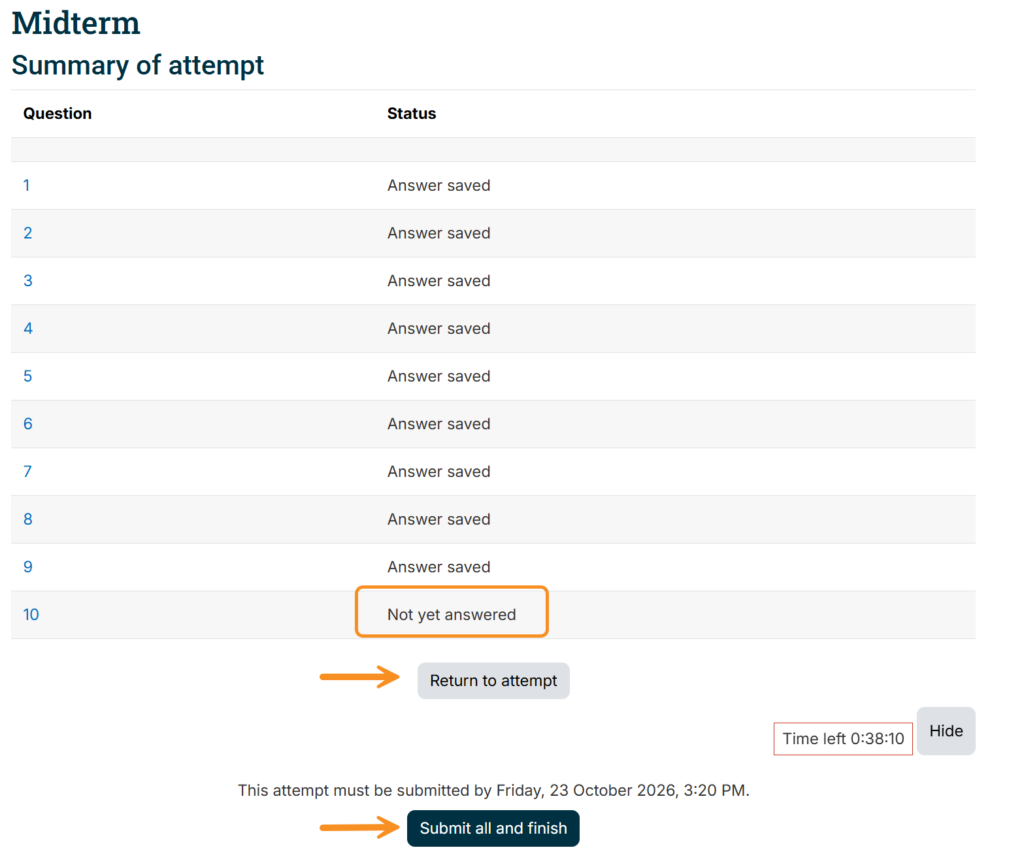
2. After selecting “Finish attempt,” you will have the opportunity to review a summary of your quiz attempt before finalizing your submission. Ensure that all questions have been answered. You will have the opportunity to return to your quiz attempt if you missed a question or would like to update an answer. When you are ready to finalize your submission, select “Submit all and finish.”
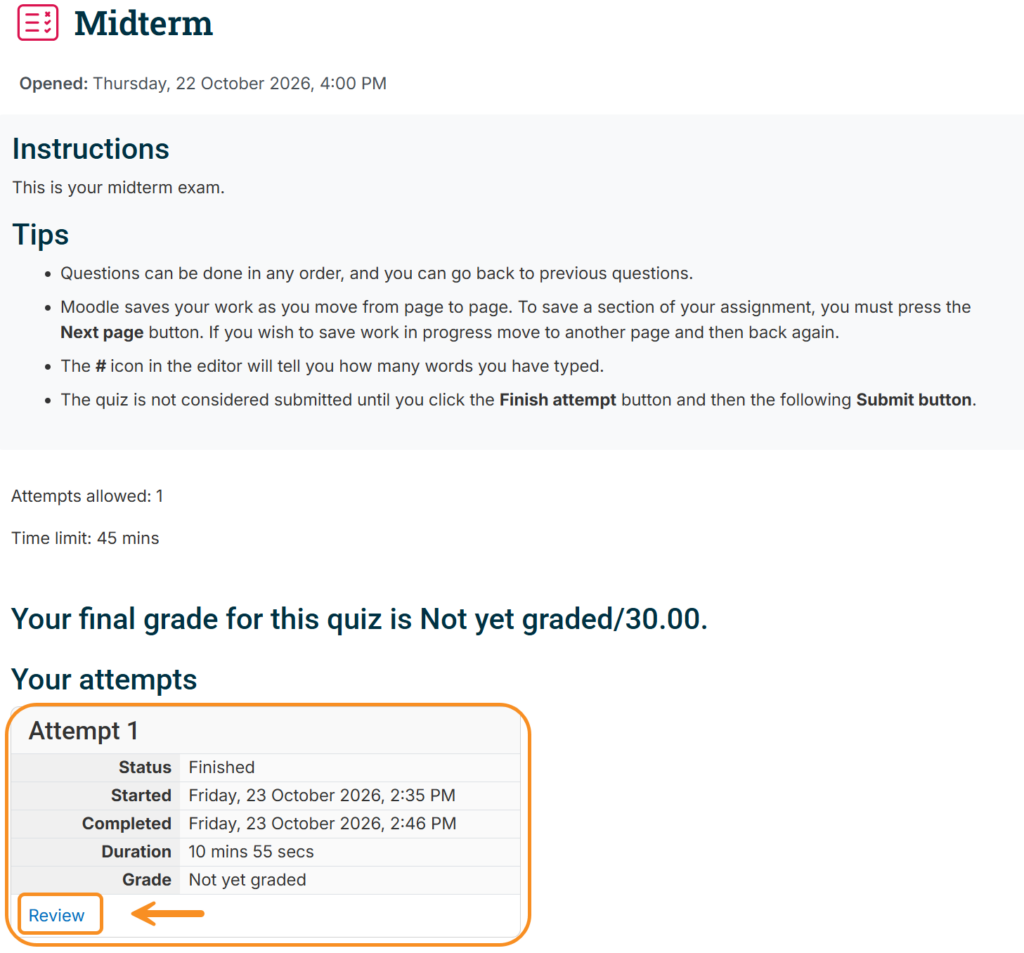
After you have completed your quiz, the status of your quiz attempt will be displayed at the bottom of the activity. If your instructor has enabled it, you can review your quiz attempt. Depending on how the quiz review options were configured, you may be able to see an overview of your quiz attempt, whether each question was marked correct, your awarded marks/possible marks for each question, and feedback.
NOTE: Moodle will automatically mark many question types, but some questions will require your instructor to grade before your final mark is provided.
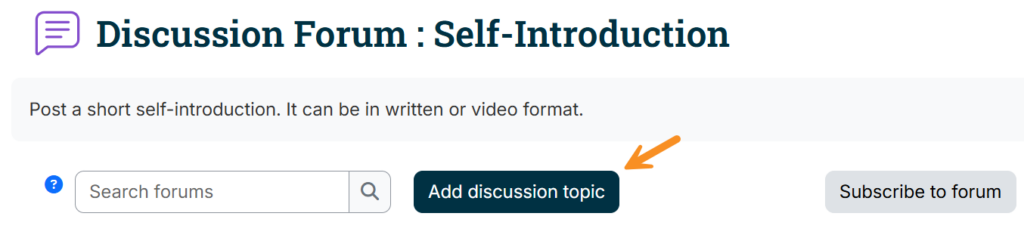
Moodle’s discussion forums are a place to share ideas, ask questions, and have conversations with your classmates and instructors virtually. You can post your own thoughts, reply to others, and take part in class discussions at your own pace. Forums may be graded or ungraded.
To add a new discussion topic, i.e., an original post, select “Add discussion topic.”
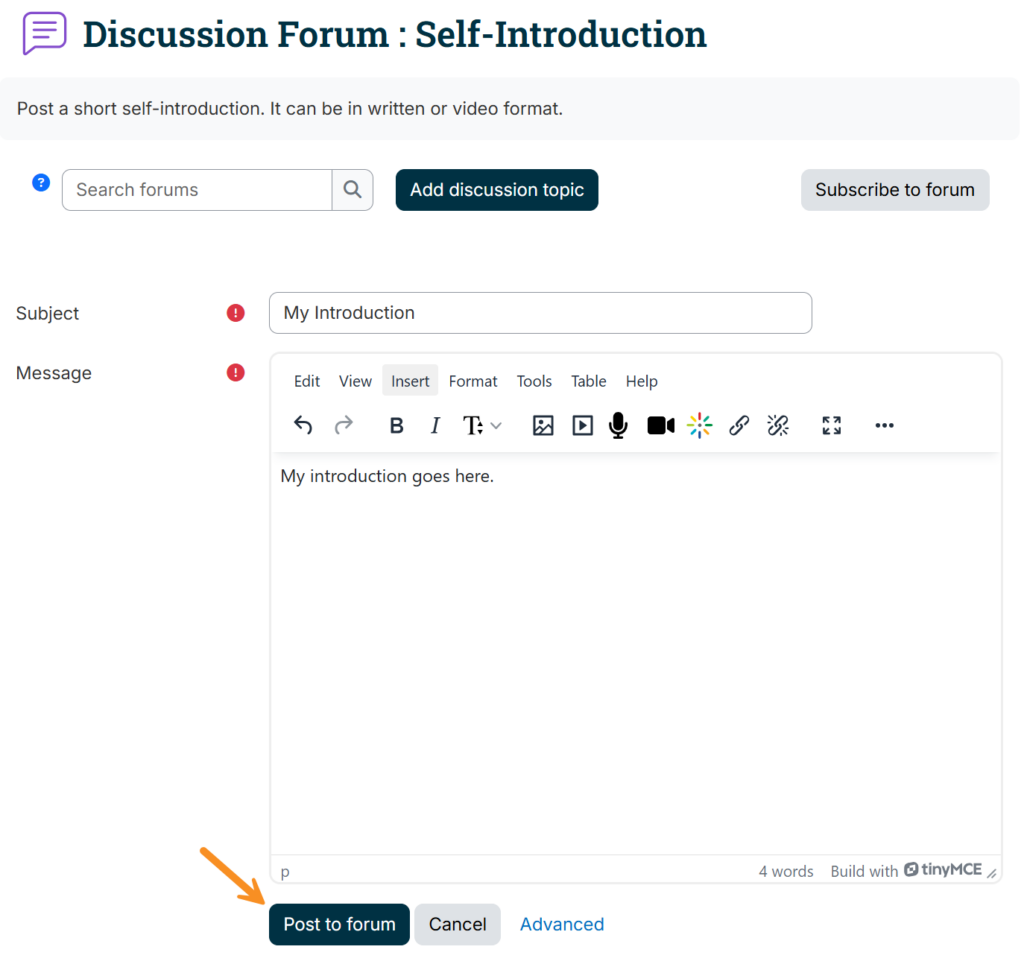
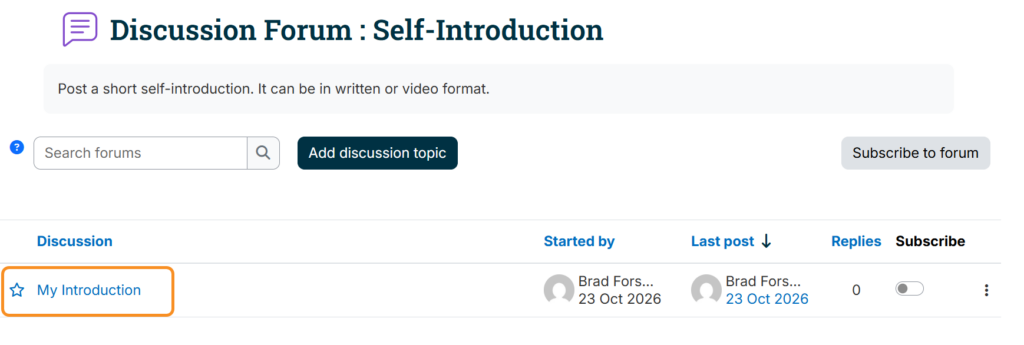
This will open the Moodle text editor. You will be required to enter a subject for your post, which will appear on the page displayed in the previous figure. Enter the body of your discussion post in the message field. You can add text, images, audio/video, and links. Hover over each icon for a description of their function. When you are ready to post, select “Post to forum.”
To reply to another student, simply click on the subject of their post.
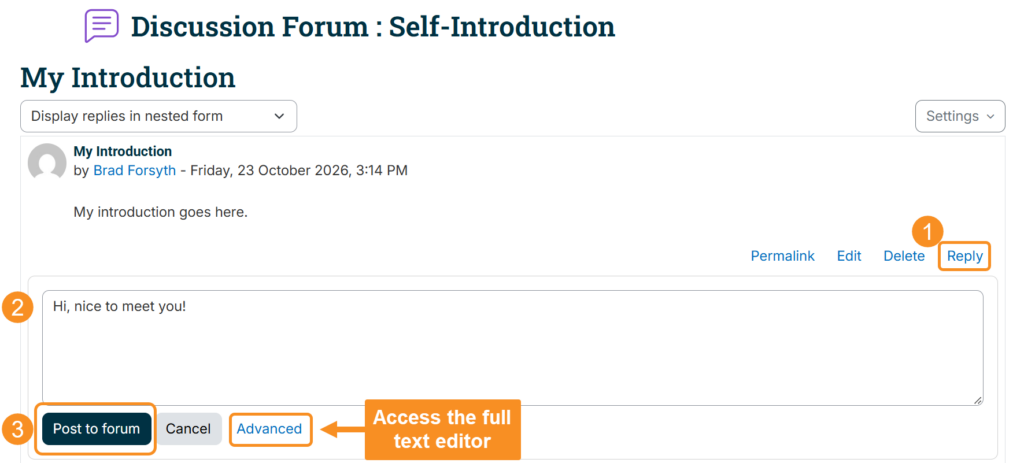
You will be brought to the student’s post. Select “Reply” to open a basic text box to enter your response, and then select “Post to forum” when you are ready. Select “Advanced” to access the full Moodle editor if you need additional options such as audio or video in your response.
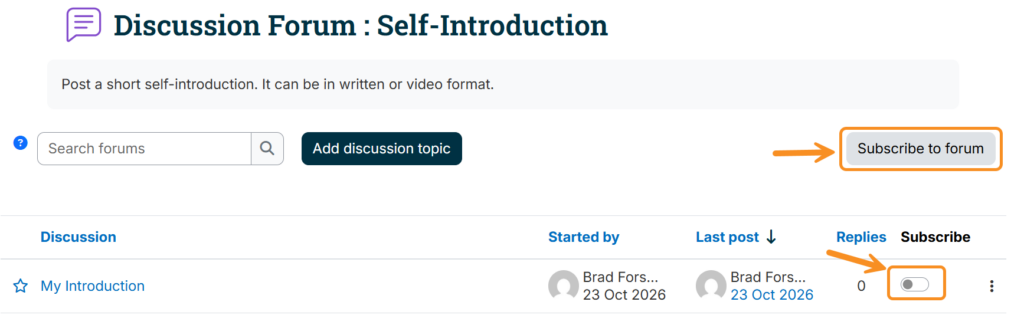
You can choose to subscribe to a forum or particular thread to receive email notifications of new posts and replies (see “How do I update my forum preferences?”).
Need Additional Help?
If you have questions about your course related to attempting a quiz, submitting an assignment, deadlines, or accessing course resources, contact your instructor first. They are your best point of contact for help related to your specific course.
If you need further technical assistance with Moodle, contact us at moodlesupport@tru.ca.
If you need assistance logging into Moodle, contact the IT Services Desk through the IT Services Portal.